The «History» tab is where every message you’ve sent through Whatsender is recorded. To simplify, we’ll call them “campaigns.” Please note that by clicking the «Clear Memory» button, located at the bottom of the «User» tab, or clearing your browser cache, all this information will be permanently deleted and cannot be recovered.
Below, we’ll explain what this tab includes and the functionalities you’ll find within it.

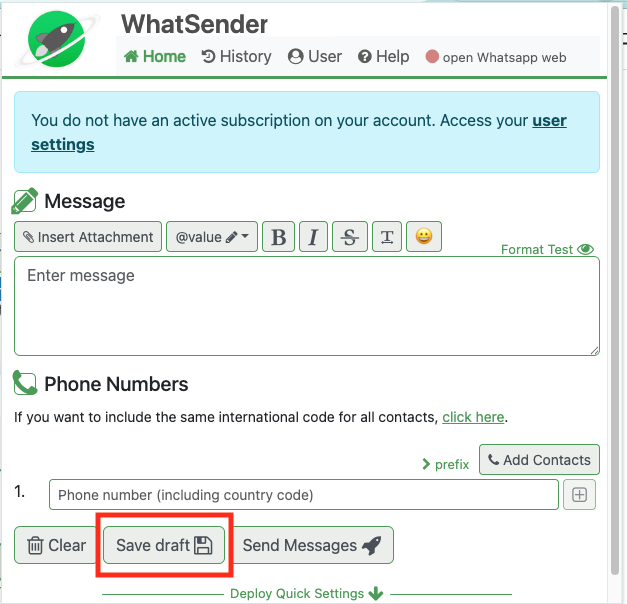
1. Date and Time: This shows the date and time either when the message was sent or when it was saved as a draft. (You’ll find the draft save option at the bottom of the User tab — see image below)

2. Message: This displays a snippet of the message you sent or saved, making it easier to find.
3. Sending bar: This bar visually shows how many messages were successfully sent and how many failed. Messages may fail for the following reasons:
- The number is not valid. There’s no way to fix this. This is common when acquiring databases through ads, as many people enter fake numbers. If a number is fake or not linked to a WhatsApp account, Whatsender will mark it as failed.
- Incorrect number format. If all numbers show as failed, the issue is likely formatting. Do not use symbols such as +, spaces, or any non-numeric characters. Full explanation here.
- Incorrect sending time configuration. If your messages have attachments and are failing, this could be the cause. Here’s how to adjust your timing settings.
4. Contacts: This shows the number of recipients and a preview of the numbers. Note that if you send 500 messages, not all numbers will be visible — only a portion. In section (6), you can view up to 1000 numbers, and for the full list, use the download summary option (5).
5. Download Summary: Clicking here gives you the option to save that campaign’s data in CSV format. You can open it in Excel, Numbers, or similar software.
The file may look like the image below — all data in one column, separated by semicolons (;).

To split the data into columns in Excel: Go to the «Data» tab → select «Text to Columns» → choose «Delimited» → then select the semicolon as the separator → click «Finish».
In the image below, you’ll see in column A the number; columns B to F show the custom field values, and column G shows the status — either «Sent» or «Invalid number».

6. Details: Clicking this will expand the campaign details. You’ll see the message sent, how many numbers failed, how many succeeded, and the campaign’s status. If saved as a draft, the status will appear as «Pending».

7. Pause: From version 2.0.5 onwards, you can pause the message sending by clicking the «Pause» button. This allows you to stop and continue later, or cancel entirely. Useful for:
- If you’re interrupted and want to reply to incoming messages later.
- If you spot a mistake in the text or wrong attachment, you can pause, fix it, and resume with the “Reuse Data” option (9).
8. Continue: If you paused a campaign, this button lets you resume sending.
9. Reuse Data: This button lets you reuse text, attachments, and contacts from a previous campaign. It reloads all contacts — to exclude some, download the summary (5), filter by status, and upload only the ones you want to resend to.
10. Retry: If your campaign finished with failed messages, you can adjust your sending times and use this button to retry only the failed ones. Invalid numbers will still fail.
11. Attachments: This section shows the attachments you sent. WhatSender allows up to 5 files — images, audio, PDFs, Word, Excel, etc. Read our guide to avoid attachment errors.