In this guide, you will learn how to use WhatSender step by step so you can send your messages correctly.
The process is very simple:
- Sign in and configure the extension
- Import your contacts
- Write your message
- Send and review the results
If this is your first time using WhatSender, we recommend following the steps in this exact order.
Before you begin
Before sending messages with WhatSender, keep these points in mind:
- We recommend registering with WhatSender or purchasing a subscription if you want to remove the limit of 40 messages per day.
- You also need to have an active WhatsApp number in order to send messages.
- Finally, make sure your contacts are properly prepared before importing them.
Following these recommendations from the start will help you avoid most common errors.
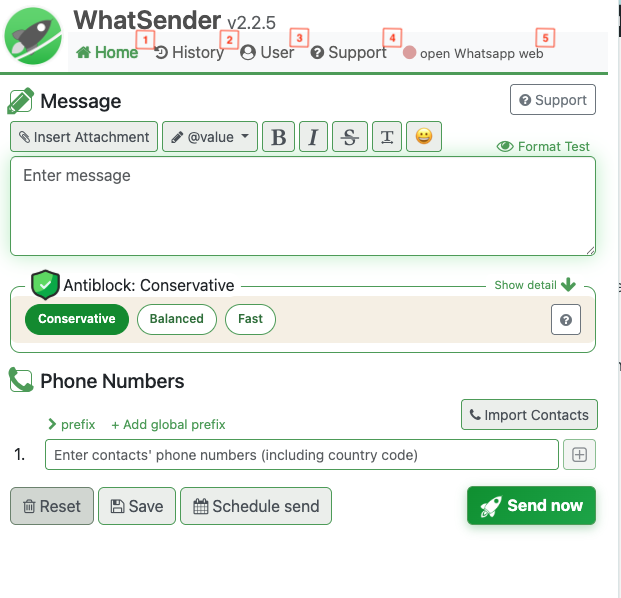
Get to know the WhatSender interface
WhatSender is made up of 5 main tabs.
- Home: This is where you prepare your campaign: write the message, choose anti-blocking options, and add your contact information.
- History: Here you can view the history of sent messages and download sending reports. Important: if you clear your laptop or browser cache, the history may also be deleted, and this action cannot be undone.
- User: This is where you configure your session. You can sign in to your account, change the language, select a general prefix, and adjust other advanced settings.
- Support: Here you will find our help page and all the tutorials you need to learn how to use WhatSender.
- Open WhatsApp Web: This button opens your WhatsApp Web session. If you are already signed in, it will show your number with a green check mark to indicate that it is connected correctly.
How to use WhatSender
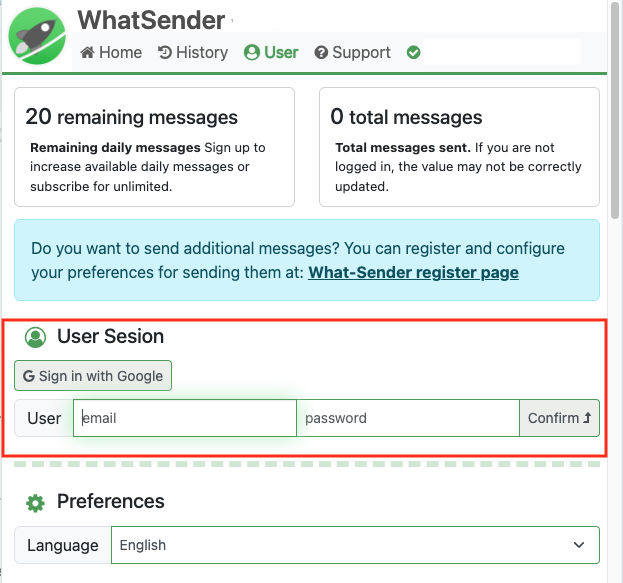
Step 1: Sign in and complete the initial setup
Link your phone to WhatsApp Web. Once it is connected correctly, your number will appear in the extension with a green check mark. If you have problems with this step, check this tutorial.

Next, sign in from the User tab. Depending on your plan, you can use the free version, which allows up to 40 messages per day, or a subscription, which removes that limitation.
From this same tab, you can also change the language to English if the extension appears in another language.
Your login details are sent to the email address you used when registering. You will receive an email called Registration Confirmation; there you will find the password to sign in.
You can find more information about this process in this tutorial.
Step 2: Organize and import your contacts
Once your session is configured, the next step is to import your contacts from the Home tab.
WhatSender is not designed to manage or edit databases inside the extension.
To organize your contacts, we recommend using Excel or CSV before importing them. This will give you more control and allow you to review the data more easily.
In WhatSender, you have 4 ways to import contacts
- Copying and pasting contacts from an Excel file.
- Uploading a CSV file. This is the only option that allows you to import custom fields. In the other options, you must fill them in manually.
- Importing from WhatsApp groups.
- Importing from WhatsApp Business labels.
You can learn more about this topic in our tutorial.
Correct number format
This point is very important to avoid errors.
You can select a universal prefix from the User tab if all your numbers are from the same country. Remember that if you choose this option, you should import only the number, without writing the prefix again.
If you do not use a universal prefix, you must import the full number including the international prefix.
Examples:
- Spain: 34674870576
- Mexico: 525568908764
Always write the numbers together, without spaces, hyphens, or symbols.
Step 3: Write your message.
Once your recipients are ready, it is time to write your message. WhatSender works like a text editor, so you can use bold, italics, emojis, underlining, and other formatting options. (Part 1)
If you cannot see the full message, you can adjust the size of the window by sliding it up or down. (Part 2)
You can also attach files. If you are running campaigns, we recommend using lightweight files, preferably under 10 MB, that provide value to your customers. If you have any problems with attachments, you can check this tutorial, where we explain how to solve them.
The @value button allows you to add custom fields to your messages. Keep in mind that, visually, you will only see @value1 and @value2. If you use @value3, @value4, and @value5, they remain stored in the browser cache and may not always appear on screen. For this reason, we recommend doing a test before sending to make sure the information is correct. We have also prepared this tutorial on how to personalize your messages.

Step 4: Select anti-blocking options for your number
If you work with a large database and want to reduce the risk of WhatsApp blocks, we have prepared a guide with recommendations that may help you. You can read it in detail here.

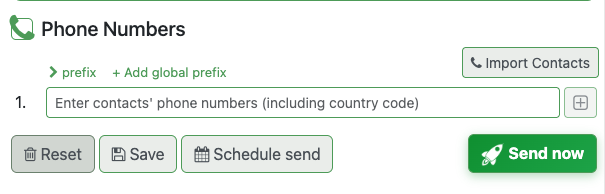
Step 5: Send your message
Once your contacts, message, and attachments are ready, just click Send Now to start sending.
In addition, WhatSender includes other options that help you manage your campaigns more easily:
- Reset: removes all the settings you had prepared.
- Save: saves your settings so you can use them later. You can find them afterward in the History tab.
- Schedule send: allows you to prepare a send for later, although you must keep your computer turned on.
- Send now: starts sending immediately.

Do you need to send the same message again or do you always send to the same contacts?
In WhatSender, we have developed a button called «Reuse Data». This button allows you to reload into your Home tab any message stored in your history. It will reload both the message and the recipients. This way, you can reuse the message, remove the recipients and add new ones, or reuse the contacts and change the message you want to send. This means you do not have to set everything up again from scratch. We explain this option in the tutorial about the History tab.
If you followed all the steps and still see a large number of failed messages, we recommend checking this guide to make sure everything is set up correctly.